Installing Windows Subsystem for Linux#
While most of RobotSwarmSimulator works the same on Windows as it does on Linux, you may need to use RobotSwarmSimulator alongside Linux-only software.
If you’re on Windows but need a Linux environment, you can use Windows Subsystem for Linux (WSL). WSL 2 is basically a virtualized Linux environment, but it’s nicely integrated into Windows. You can access files and folders on your Windows machine from WSL, and vice versa. You can even run GUI applications from WSL and have them appear alongside other programs on your Windows desktop.
See also
Microsoft’s What is the Windows Subsystem for Linux? has a good overview of WSL and its features.
Installing WSL#
These days, installing WSL is pretty easy. You should be able to install WSL with just one command from an Administrator cmd or PowerShell prompt.
wsl --install
This will install WSL and use Ubuntu as the default Linux distribution.
This guide assumes you’ll be using Ubuntu, but if you want to use another Linux distribution, or change any other settings, you can follow the WSL installation instructions.
Old Installation Method
Prior to November 2022, the default installation method was to use the optional WSL/lxss component. The Windows Store version is now the default, and this change was documented here:
If you want to use the older installation method, see Manual installation steps for older versions of WSL or you can follow the instructions below.
Enabling the Windows Feature
Open Windows Search, type features and select Turn Windows features on or off.
Scroll down and check the Windows Subsystem for Linux box.
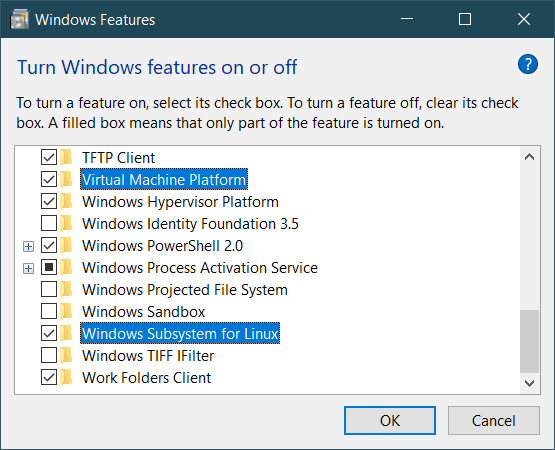
Then, click OK and restart your computer.
Open a PowerShell prompt as an Administrator.
PS C:\> Enable-WindowsOptionalFeature -Online -FeatureName VirtualMachinePlatform -NoRestart
PS C:\> Enable-WindowsOptionalFeature -Online -FeatureName Microsoft-Windows-Subsystem-Linux
Do you want to restart the computer to complete this operation now?
[Y] Yes [N] No [?] Help (default is "Y"):
Type Y and press Enter to restart the computer.
Open a PowerShell prompt as an Administrator.
C:\> dism.exe /online /enable-feature /featurename:VirtualMachinePlatform /all /norestart
C:\> dism.exe /online /enable-feature /featurename:Microsoft-Windows-Subsystem-Linux /all
Then, restart your computer.
Installing WSL
You shouldn’t need to manually update the WSL kernel or set WSL to version 2, as these should already be at the latest version, but if you want to do so manually, you can follow the instructions to Download the Linux kernel update package and also Set WSL 2 as your default version.
Now to install WSL:
Open the Microsoft Store and search for WSL.
Then click Get or Install.
Then, search for your desired distribution on the store and install it.
Open a terminal (wt, cmd, pwsh, etc.) as an Administrator.
Then, get the list of available distributions with wsl -l -o and
install the desired distribution with wsl --install --distribution {distribution_name}.
> wsl --list --online
> wsl --install --inbox --distribution <DISTRIBUTION_NAME>
Once it’s installed, you’ll need to boot the WSL environment for first-time setup.
You can type wsl in the terminal or search for it in the Start Menu.
Choose your desired username and password. Make sure to remember your password! It’s not connected to your Windows password.
Common Installation Errors#
Microsoft has some troubleshooting steps for common WSL errors:
Troubleshooting Windows Subsystem for Linux
You might also try the old installation method.
Manual installation steps for older versions of WSL
If you’re having trouble with GUI applications, see this guide: microsoft/wslg
If you’re still having problems, try forcing X11 forwarding instead of wayland:
Disable WSLg: microsoft/wslg#523
Install a windows X server. You have several choices:
Opticos/GWSL-Source (Works best, but prebuilt binaries are paid)
marchaesen/vcxsrv (Free)
Xming (Free, old)
Read these answers on StackOverflow to set up X11 forwarding.
While troubleshooting, you can use xeyes and/or glxgears to test if gui apps are working.
You may need to install them if they didn’t come with your distribution.
sudo apt install xorg-x11-apps mesa-utils libgl1-mesa-dri
Post-Installation#
If you’re new to WSL, Microsoft has a short lesson on getting aquainted with Linux and how to use it for development.
Here are some more resources for getting started with WSL:
Best practices for set up highly recommended
Getting started with Linux and Bash highly recommended
Install RobotSwarmSimulator
Development Install Guide
Already installed RobotSwarmSimulator? Check out the Basic Usage tutorial.